how to add custom domain to blogger free 2017
A Blog with a custom domain is more attractive for the visitors then the blog having subdomain of blogspot.com. Blogger allow authors to add custom domain to blogger. In following few steps,
I have added the free domain for demo. However, You can add any commercial domain by following the same steps.
Step One: Sign up and Register free Domain
1. Go to www.freenom.com
2. Register new account either by filling sign up form or clicking the social media icon.
3. After you have successfully verified your email and sign in to account click on register a new domain.
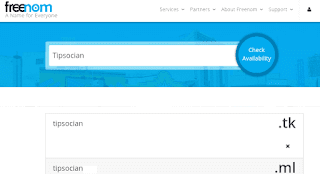
4. Enter your required domain and click the check availability button.
5. Here you can see your domain with available TLD (.tk, .ml, .ga, .cf) etc.
6. Select your favorite one. For me I have selected with ".tk" TLD.
7. In next step select the life of domain. I have selected 1 year.
Step Two: Information required to point the domain to your Blog
3. Insert your domain along with www i.e "www.yourdomain.tk" and click save.
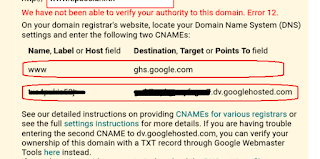
4. You will see error along with additional details of two CNAMEs.
5. Write down these values we will need later.
Step Three: Point your Domain to your Blog
1. Go to freenom dashboard
2. Click on My Domain > Manage Domain
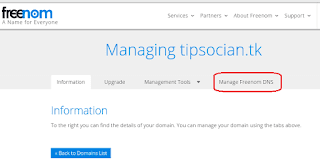
3. Go to Manage Freenom DNS
4. Add one by one CNAME records as shown in below image. Put the values you Noted during Error on Blogger Dashboard.
5. Add A records as shown in below image. Put the IP address as shown in below image. Leave the name field blank and save record. Repeat this for all 04 IPs.
You have almost done every thing in freenom dashboard. Your Domain will be activated within 24 hrs. For me it only took 05 minutes.
Final Step: Remove Error and Complete Process
After activation Your Blog can be visited worldwide from new domain. Your Blog can also be visited from the old url "yourblog.blogspot.com". However, when you visit your blog with domain without www following error is thrown by browsers.
1. Go to Blogger dashboard.
2. Go to Setting > Basic and click Edit shown with your new domain.
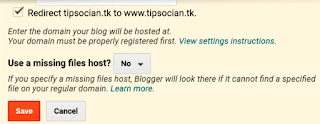
3. Marked Ticked the the check box as per below image and click save.
Congratulation you have added your new domain to your Blog.
Thanks for reading my post. You may share it with your friends if you likes.


No comments